Click HERE to see the End User License Agreement (EULA)
Hardware Requirements
Memory: Only the Charts feature uses any significant amount of memory. The more charts you load, the more memory is used. So try to load just charts used in your racing area.
Storage: The app stores various data in folders it creates in your 'Documents' folder. These are for charts, reports, track logs, etc. Usually not more than a few megabytes, mostly for charts.
GPS: Your device MUST have a GPS receiver.
Camera: The 'Virtual Marks' function requires access to your device's rear facing camera, but does not record any images or video.
Orientation: Virtually all devices have an orientation sensor so they can tell if they are tilted or rotated.
Compass: Your device SHOULD have built-in compass hardware. Often called a 'geomagnetic sensor'. You can tell by taping the 'Help' menu item in the app menu. Most, but not all, functions will operate without it. If you do not have the hardware, you will see the following at the top of the help display:
"WARNING: NO COMPASS FOUND
Your device does not appear to have a physical Compass. This is often called a 'magnetic field sensor'. In this case, compass readings used in some modes will not be available. Also, the 'Virtual Marks' function will not be available, as it requires a true magnetic compass to determine where your device is pointing. Your GPS heading will be used in its place for other functions, however you must be in motion for GPS to determine your direction."IMPORTANT: CALIBRATE YOUR COMPASS BEFORE EACH RACE!
See your device manual for instructions. Some ask you to move your phone through a large figure '8' while holding it flat. We have seen newer devices recommend tilting or rotating the device through each axis: pitch, roll, and yaw (forward end over end, then rolling sideways, then spinning it while flat in your hand). The Compass is used for headings if the GPS cannot determine it (like if you are moving very slowly, anchored, on shore, becalmed, etc..) If the 'Status' info in the lower part of a screen shows 'Compass Brg', then make sure your phone is aligned to point forward on your boat. If it says 'GPS Brg', then alignment is not important. 'GPS' will usually be the case when moving more than a knot or so.
App Organization
RaceTac has various activity screens appropriate for the main stages of racing. It also has a 'menu bar' across the top for quick navigation to relevant activities when not on the main 'Home' screen. There is also a menu available for less frequently used functions such as setting preferences.In this manual, we will lay out the concepts, various screens, and menu bar functions.
- The Home Screen
- General Concepts
- Venue Management
- Mark and Gate Management
- Import/Export Marks
- Course Management
- Start Mode
- Race Mode
- Charts
- Performance Analysis
- Virtual Marks Mode
- Preferences
- Race Report
Home Screen (Click on area of interest)

General Concepts
Data:
RaceTac stores your 'Marks', 'Course', and 'Named Courses' under a 'Venue'. Thus, you can add any number of racing Venues (accessible through the menu) and name them and give them a description. Such as one for your Yacht Club, and another perhaps for a Racing Association, or even one for a particular regatta. When you switch Venues, the Marks and Course last set are restored as the current ones. Note on Start Line, Gates, etc.: A 'Mark' can either be a specific location, or a 'Gate' such as the start and finish lines, which are made up of two 'Marks'. The 'Start Line' is typically a 'Gate' with the Committee boat at one end, and a regular Mark at the other end. We recommend creating a 'Mark' named 'CB' for the boat, as it usually moves from race to race, and you will want to sail off its stern, on the line, and mark it, in each race. See 'Mark and Gate Management' for more detail.Dialogs:
Most dialogs for Mark or Course management allow you to long-press a Mark button, wherever it may be shown, to set its location to your current location. Useful for movable or off-station Marks.Display Modes:
Virtually all modes respond to 'Night Mode' and will shift colors for better visibility at night. There is also an option to display the current and next Marks with a color corresponding to the side you should leave them on when rounding. Distance values shift from the 'Major Unit' to the 'Minor Unit' when you go under one 'Major Unit' in distance. See the 'Preferences' Section for setting units.
Start/Race Timer:
This is your usual racing timer and appears at the top of the Main and Start Mode screens. It starts timing your race after the start countdown completes. It can be set to any start sequence using the menu for preferences. You can adjust the countdown time by long pressing the Start Timer digits to get a pop-up that lets you increase or decrease the number of minutes, even while the timer is running. For example, if you miss the warning signal, and pick back up at the prep signal a minute later. See the 'Preferences' Section for detail.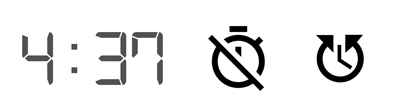
- The Icon:
 Is a button that will start the timer. Once running, during the start countdown it will 'sync' the timer to the nearest minute. So if you missed the usual '5 minute warning' by a few seconds, you can sync up on the '4 minute prep signal' etc. When the start countdown goes to zero, the app automatically switches to 'Race Mode'. When it is counting up to time the race, this icon does nothing.
 - The Icon:
 Is a button that will stop the countdown timer and reset it to your initial time if starting. After the start, while timing the race, it will stop the race timer and log a completed race for the 'Race Report'. Hitting it again will then reset for a new start.
 - 'AutoFinish' preference: The race timer can be stopped automatically when you cross the finish line. AUTO-ROUND must also be enabled for this to work. NOTE: Due to the fact that a 'finish' is judged by the first bit of your boat to cross the line, not your GPS device position (cockpit), and GPS accuracy, and the fact that a GPS 'Fix' is usally acquired about once a second on most devices, this finish time can be off from what your race committee records. Since they have line-of-sight on the line, they are apt to be more accurate.
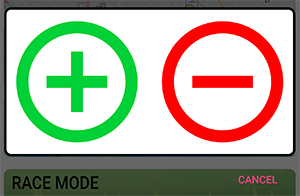
- 'Long Pressing' the clock digits brings up a display that let's you move the timer forward or backward a full minute. For example: If you miss the 'warning' signal entirely, you can start on the 'prep' signal and then subtract a minute to get the clock in sync again. It looks like this:
Sounds:
You can choose between tones, and voice, for sounds, selectable in the Preferences. For Tones, the Start Timer will sound a long beep at each minute, then a double beep at each 10 seconds within the last minute, then each second in the last 10 seconds, then a long beep at the start. For Voice, it will announce the same sequence, and adds one at 15 seconds. The volume can be set with your device's volume controls while the app is running. Note that the 'media player' is the volume used, so make sure it is turned up if you want to hear these. They will play through a Bluetooth connected speaker as well.Notes on Voice: The voice used is the 'Text to Speech' voice provided with your device by the vendor. Various devices have options in the device settings to control this voice. See your device settings under 'Langauge and Input'. Also, turn up the media player volume so you can hear better.
Feature Hints:
There are a number of pop-ups with hints on various pages, especially new features. They only show once. If you want to see them again, select the 'Reset Feature Hints' on the main menu.Menu
Tapping the menu icon in the top toolbar of the main page will open a menu like this (you can click an area in the image below to jump to details):
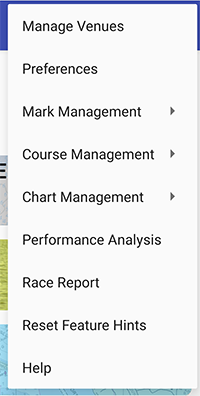
This is where you find things like the Prefernces mentioned through this document. The rest of the app pages have context specific menus that may be different.
Venue Management
This dialog (accessible from the menu) allows you to setup, delete, or edit a Venue. It is only available from the menu.
Marks, Course, and Named Courses are stored under a Venue.
The dialog shows a venue list, with the 'Current Venue' at the top, followed by any others.
By taping a venue, you bring up a sub-dialog which allows you to:
- Set as Current: Switch the venue to be the Current one. All Marks and the Course will be swapped in as the live set. Remember to do this when sailing in a new area of Marks!
- Edit: Change any info about the Venue.
- Delete: Remove a Venue.
- Cancel: Do nothing.
Mark and Gate Management
The 'Manage Marks' dialog is available from either the main screen, or from the menu. The sub-menu off the main menu lets you select the mark management dialog, or the IMPORT or EXPORT dialogs. You can enter new Marks, or Edit or Delete existing Marks. Below is the Mark Management dialog:
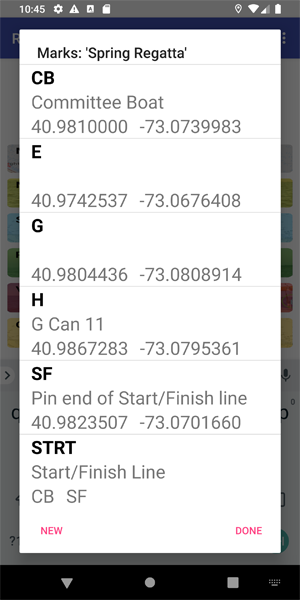
Types: Marks can be either specific locations as in mark 'H' above, or 'Gates' which are lines between two regular 'Marks' as in mark 'STRT' above which is the line, with ends at the committee boat CB and the pin end SF. Typically this might be your starting line, finish line, or a racing gate. The distance to a 'Gate' is the closer of either end Mark if you are outside the end Marks, or your perpendicular distance to the line if in between the Marks. The bearing will also be to the closest Mark if outside the line, or the perpendicular angle toward the line if inside the Marks.
Dialog: In the dialog above (with a scrollable list of any Marks), either choose 'New' or 'Done', or long-press a mark to simply set its location to the current location, or tap the Mark you want to change, and a sub-dialog appears which lets you do several things:
- Set Location: Sets the Mark's location to the current GPS location. Useful if a Mark has moved. For example, use this before each race to set the location of the committee boat. You can also simply long-press the Mark entry in the previous dialog.
- Edit: Edit any field for the Mark.
- Delete: Delete the Mark.
- Cancel: Don't change anything.
The edit dialog that appears when you choose 'New' or tap a mark and choose 'Edit' looks like this:
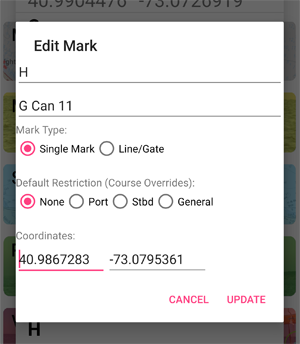
Name: First Line. Give a Mark/Gate a short name. Try to use one to 4 characters, as these are what is shown in other dialogs and modes, and you do not want to take up a lot of space with long names. Use uppercase for visibility. For example, use 'STRT' for the starting line, or 'CB' for the Committee Boat.
Description: Second line. You can enter a more detailed description here. For example, the Mark name might be 'J' from your club mark list, but the description can be 'Can 11a off Oldfield Point'.
Mark Type: Choose either a regular Mark, or a 'Gate'. See 'Gates' note below.
Restriction: Set if a Mark is a 'Restricted' type. These are not regular course marks, but indicate that this mark must be avoided, generally, or left to port or starboard, but not 'rounded' per se. Thus indicating a restricted area. Often used in distance races when an intermediate Nav Aid must be left to one side or another, or for restricted government areas for example. These will blink on the chart display with the appropriate color (Blue for a general case, Red if they are to be left to port, Green if to starboard). They can be overridden within a course, as they might be left to port in one direction, and starboard coming back. Thus you do not need to set this at the 'Mark' level, but only at the 'Course' level if you wish. See 'Course Management' for details on 'Course Routing'.
Location: There are two location fields, for either latitude and longitude, or when entering a 'Gate', for two mark names. If you leave them blank, the Mark will be set to your current location. You can enter coordinates using several formats:
- [+,-,N,S,E,W]DDD.DDDDD[N,S,E,W] : Decimal Degrees.
- [+,-,N,S,E,W]DDD MM.MMMMM[N,S,E,W] : Degrees and Decimal Minutes.
- [+,-,N,S,E,W]DDD MM SS.SSSS[N,S,E,W] : Degrees, Minutes, and Decimal Seconds.
Gates: For a Gate, instead of entering coordinates, enter two other Mark Names. For example, I keep a Mark named 'CB' for the Committee Boat, and 'SF' for 'Start/Finish'. Our 'SF' is a buoy that never (we hope) moves. And I set the 'CB' location before each race by sailing by its stern and setting the location when I am right on the line, since the committee sets the line based on wind conditions. So Gate 'STRT' has CB for one end and SF for the other.
Importing and Exporting Marks
You can import or export marks from/to three data formats and one 3rd Party App: CSV (Comma Separated Values), GPX (GPS Exchange), or KML (Google Earth) formats, and Plan2Nav Navigation App.
IMPORTANT: Before importing, set your current Venue to the one you want to import into. See Venue Management.
Importing:
CSV File Format: See this sample .marks file if using CSV format: Sample.marks (click)
There are three ways to import Marks:
- You simply get the file to your device using any method you want. You can simply mail it to yourself as an attachment if you want. The filename may end in '.marks', '.gpx', '.csv', or '.kml'. Then simply click the file, as an email attachment, or using your choice of file explorers. Some email clients allow you to just click the attachments. In some you may need to download it, and then use a file explorer to look in your downloads folder and click it there. For example, you could have a file called 'myclub.marks' in either CSV, GPX, or KML format. The program automatically detects the type of contents and loads it appropriately.
- Use the 'Import Marks' Menu option, and choose the file you want to import from. Get the file to your device using any method you want.
You also have the option of simply updating the Marks which also adds any new ones, or replacing all the marks with a new set.
Also, the app can only show the 'shared' file areas like 'Download' and 'Documents'. - Plan2Nav: Use the 'Import Marks' Menu option, navigate to the folder where Plan2Nav keeps it's databases (varies from device to device), and select 'favorites.db'.
Exporting:
Use the 'Export Marks' Menu option. You will get a file dialog. Select the folder you want the export file placed. You will see files as well, but they are just for reference. Then tap 'Export'. You will get a dialog to let you choose the export format. NOTE: Filenames will be 'RaceTac_#.marks' where the # will be the next highest found in the folder, to prevent overwriting an existing file.
- GPX Files:
- A standard used by a number of navigation type programs. It is fairly complex, so you would probably exchange marks with some other navigation software.
- KML Files:
- A standard used by a number of mapping type programs, most notably Google Earth. You can put your marks in a 'folder' or the root folder of 'My Places' and then export the folder from Google Earth. Use a 'KML' NOT a 'KMZ'
- CSV Files:
- A simpler format, and could be edited by hand. See the www.RaceTac.com website for additional information about it's format, with a sample file.
- Plan2Nav: Navigate to the folder where Plan2Nav keeps it's databases (varies from device to device), and tap 'Export'. It will add new waypoints, or update existing ones of the same name. You also have the option to replace all the Waypoints in P2N.
Course Management
This screen allows you to quickly enter or change the Marks comprising the course.
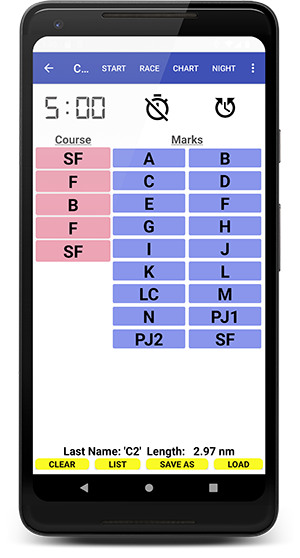
It also displays the 'Start Timer' at the top, so you can work on entering the course while monitoring the starting clock, or even start/sync the clock while in this mode.
Sections: There is a column to the left which is a list of the Marks in the course from start (top) to finish (bottom). The background color corresponds to the side the Mark should be left on. Light Red for Port, light Green for Starboard, and light Blue for Optional. Gates are always Optional by default. A border around it means it is a 'Restricted' mark (see below). The area to the right is a simple list of all Marks/Gates in the current Venue.
The screen is scrollable. Long-pressing any Mark anywhere in the dialog will set its location to your current location. At the bottom, you will see the current length of the course (only if the coordinates of all Marks are known). This length uses the mid-point of any 'Gates' for its calculation. Below that are three buttons:
- 'Clear' button to reset to an empty course.
- 'List' button brings up a dialog of saved courses that lets you load or delete them.
- 'Save As' button to Save the current course under a name.
- 'Load' button to Load a previously saved course as the current course.
Operation: Tap a Mark name to add it to the course. It will be added to the end of the course. Tap any entry in the 'Course' column to show a dialog with the following options:
- Set Location: Set the location to the current GPS location.
- Remove: Remove the Mark from the course.
- Move Up: Move the Mark up one position in the course.
- Move Down: Move the Mark up one position in the course.
- Set Rounding: Change the side the Mark should be left on when rounding. Only effects the Mark in the course. You can enable or disable the display of this (shows color for the current and next Marks text in the screens), and can set the default, in the Preferences.
- Set Course Restriction: A 'Resrticed Mark' is one that must be left to Port or Starboard, but not neccesarily 'rounded' per se. For example for safety if it marks rocks. Override any restriction at the Mark level, setting it for just this course entry (it might be to Port on one leg, and Starboard coming back on another leg). Or use whatever the 'Mark' restriction is. See Mark and Gate Management for more details. NOTE: A Restricted course entry will display in the course mark list with a highlighted border, colored according to the type of restriction being applied. 'Course Routing': In 'Race Mode' a restricted mark will only show in the 'Next' and 'Previous' buttons if you actually need to steer to it, meaning the leg to the next unrestricted mark puts you on the wrong side of it, and you must go around it.
- Edit: Allows you to edit the Mark directly. Same function as editing from the 'Manage Marks' dialog.
- Cancel: Do nothing.
Course Import/Export
As described under Course Management, you can save 'Named Courses'. You can also export them to a file which can be used to Import them onto another device, or share with other users. You can import that file, or create your own file on your computer and then import that. The format if straight forward, as it is just a text file you could create with any raw text editor such as Notepad. You can get the file onto your device any way you want, such as emailing it to yourself if you have email on your device, or through a USB connection, etc.
Format:
- The file must be a plain text file.
- The file name must end with either '.csv' or '.courses'
- The first line in the file must be just !courses or !COURSES (not case sensitive). The exclamation point is a comment indication.
- Empty lines and lines starting with either a '!' or '#' are treated as comments.
- The detail lines are 'Comma Separated', which means the file could also be exported as a CSV file from a spreadsheet.
- A line representing a named course starts with the course name, followed by a list of marks all comma separated. Mark names are not case sensitive.
Example File:
			!COURSES

			! RaceTac Named Courses: Export File Created: Main Venue: 2020-08-05 12:26:33

			NS-E1,STRT,C,A,STRT

			NS-E2,STRT,C,A,G,STRT

			NS-E3,STRT,C,A,G,C,STRT
So in this example, it might be importing 3 named courses. These might be named this way for 'Non-Spin East #1' etc. But you can name them anything you want, just do not use a comma in the name. The 'STRT' mark is probably setup in RaceTac as a Gate type, being used for both the start and finish lines.
Start Mode
This screen shows you just information relevant to your pre-start sequence. You can get to it from the main screen or the menu bar.
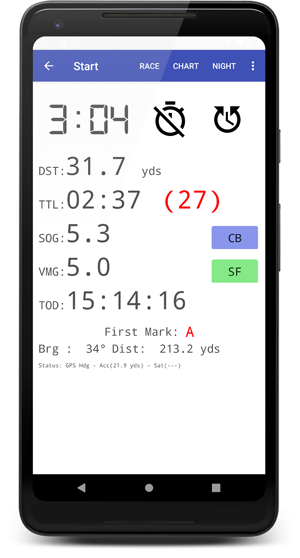
It shows you the 'Start Timer' clock at the top, as well as critical heads up data.
- DST: Is the distance to the line. This is the 'Cross Track' distance (distance perpendicular to the line) if you are between the two ends. If you are outside the line, it is the distance to the closest end.
- TTL: Estimated Time to the Line on the current course. Followed by Time-To-Burn in parens.
- Time-To-Burn: The following are the colors and indications:
- Value is number of seconds, either late or early.
- NOTE: GPS Accuracy can affect this by several seconds. So watch your line when you get close!
- 'N/A' Means a value cannot be calculated due to speed or bearing.
- GREEN: You are safe (won't be early), but late at current speed and bearing.
- RED: You will be early, and you need to burn some time.
- BLACK: You are within 2 seconds either late or early. Accuracy cannot be calculated any better.
- EXAMPLE: In the screen shot, you have 3:04 until the start, and your time to the line is only 2:37, so if you don't change speed or course you will be 27 seconds early, thus it is in RED to warn you.
- SOG: Speed Over Ground.
- VMG: Velocity Made Good (see below).
- TOD: Time of day. Useful when waiting for the first warning.
- First Mark: Shows you the first mark after the start. with bearing and distance of your first leg.
- Mark Buttons: The two ends of your starting line are shown as buttons to the right. The closest to the first mark is in green. Tapping them will 'ping' them to the current boat position. Long pressing them will undo a mistaken ping. Just sail by the 'Pin End' mark or Committee Boat to ping your line and figure out which end is favored from a distance POV. (Not always the truly favored end due to wind, current, and tactical sitaution)
- Status: Shows the status of the navigation sensors, such as which sensor is being used for the boat heading (Compass or GPS), the current GPS accuracy, and the current/total satellites being used for the location fix.
Start Sequence: See the Preferences section for details on setting the type of start sequence.
VMG vs SOG: 'Velocity Made Good' is generally more important than 'Speed Over Ground' when racing. For the start, assuming the starting Mark is really a 'Gate', the VMG, distance and time are calculated using 'Cross Track Distance', which is your distance from the line on a perpendicular to the Gate line, or if you are beyond the end of the starting gate marks, it uses the closest gate mark.
Note: When the start timer reaches zero, this screen will automatically jump to the 'Race Mode' screen.
Race Mode
There are two layouts for the Race Mode Screen: A text version, and a Graphical Version (default, shown here). A Preference 'Race Mode Display' let's you choose which you prefer.
This screen shows you information relevant after you have started and are racing towards some current Mark. You can get to it from the main screen or the menu bar, and it will appear automatically when the start timer reaches zero.
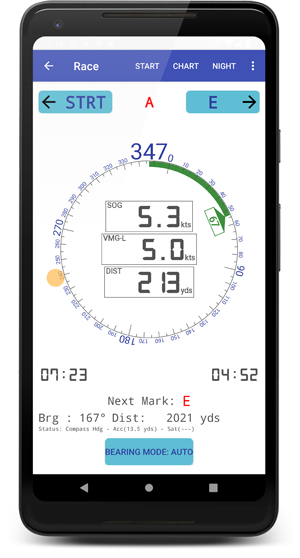
Sections:
- Top: Course Marks - The center is the name of the Mark you are currently sailing towards (or want to be). Tapping it will switch to the charts display. The left and right are buttons named for the previous or next Mark. You can tap them to manually advance or go back. In 'Auto-Round' mode (See Preferences) this will advance to the next Mark automatically as you round a Mark.
- Race Data: Shows info to the Mark, with 'Relative' bearing showing degrees to Port or Starboard, colored in graphical mode for each (Red or Green respectivly, in the screen above, mark 'A' is 67 degrees off your Startboard bow), your current boat heading (at the the top in graphical mode, here it is 332 degrees), Speed-Over-Ground (SOG), Velocity-Made-Good (VMG), and Distance to the Mark. In Graphical Mode, the Heading and Bearing are shown as a compass rose that rotates for heading, and has a colored arc inside it showing the relative bearing to the mark, colored red or green, with an indicator that has the degrees. See the 'Start Mode' section for more info on these.
- VMG Note: There are two VMG's available. You can switch between them by tapping the VMG box in the middle. Only available in Graphcal mode:
- VMG-C: VMG on the course. This is your VMG toward the mark itself. This changes as you sail because the mark bearing changes. When the mark is bearing 90 degrees you of course are sailing by it and this VMG goes to zero.
- VMG-L: VMG on the leg. This is your VMG toward a line through the mark and perpendicular to the leg. This is available because we don't have wind info. This would be similar to VMG to the wind on a direct upwind or downwind leg. It shows you your effective progress. It does not change with bearing to the mark because it is relative to the leg.
- Orange Ball - Following Mark: In graphical mode, the Orange Ball that sits on the edge of the compass rose is the bearing of the next mark after your current one. This helps you plan your rounding by figuring out where you are going next. In the shot above it is on the left.
- Clocks: The left clock is your total time since the start. The right clock is estimated time to the mark based on VMG.
- First/Next Mark: When Starting, this is the 'First Mark' and is bearing and distance to the first Mark from your boat. When Racing, after the Start, it is the 'Next Mark' and is a heads up of the bearing and distance from the current Mark you are sailing to, to the 'Next Mark' after that, so you can plan your rounding. Also see the Orange Ball in graphical mode.
- Status: This is the same sensor status as in the 'Start Mode' display.
- Bearing Mode Button: Controls how the RELATIVE bearing (Rel Brg:) to the Mark is calculated. Why? Because your boat's heading might not be where you are pointing, due to leeway and/or current. Thus the relative bearing if using a GPS heading might not be relative to your bow. Touching the button toggles between 2 possible modes:
- Auto: Bases the calculation off whichever heading the program is using, GPS or Compass, as displayed in the status line. The program prefers GPS if available.
- Compass: Uses the Compass in your device. NOTE: This is relative to your device's orientation, not your boat's! So keep your device pointing forward!
- AutoFinish: When enabled (on by default), the race timer (on the main screen and start screens only) will stop when you cross the finish line, and an entry is made in the race log. See the 'Race Report'. NOTE: If the 'Finish' is a single Mark (not a Gate), then the finish line is assumed to be a line through the final Mark, and perpendicular to the line from the previous mark to the final mark.
Virtual Marks Mode
This screen uses the rear facing (main) camera of your device to show whatever it is pointing at, and overlays the live image with indicators of where Marks are supposed to be. Each Mark is represented by a circle, with a vertical line coming out of it which is proportional to your distance to the Mark. The longer the line, the closer you are. The name of the Mark is in the center of the circle. There is also a thin vertical line across the whole display, which is the center line where the device is pointing.

Bottom Bar: At the bottom center is the current bearing the device is pointing in. On either side are buttons which select which set of Marks to display.
This is very useful at night or in poor visibility conditions, or simply as a bearing compass.
Charts
Chart Support requires that you agree to the Terms and Conditions, presented in a dialog when you first click the button on the main screen. For detailed information, see the 'Technical' tab under 'Charts' for more detail.
Performance Analysis
This feature shows a screen with 3 graphs:
- SOG - Speed Over Ground
- VMG-L - VML on the Leg - VMG to a line perpendicular to the leg and through the destination mark. In lieu of actual wind data which could show VMG upwind or downwind.
- VMG-C - VMG on the Course - VMG to the mark. This changes as your bearing to the mark changes. It is effective speed to the mark.
There are 3 buttons:
- Settings: Lets you change the amount of time on the graphs. Default is one hour.
- Export: Sends an Excel™ spreadsheet of the data to your email client for sending.
- Mark: This enters a mark on the graphs at the time you hit the button. This allows you to record some event that might change performance, such as trim, heading, etc.
Preferences
These are available from the menu. In 1.21 and later, they have been put in groups to minimize the need to drag.
Keep Screen On: If 'ON' then your device screen will not turn off while the app is showing.
Show Magnetic: If 'ON' then all headings and compass readings will be magnetic, and will account for your local magnetic declination (aka Variation). Else readings are 'True'
Race Mode Display: Select either the Text, or Graphical display, as the default display for the Race Mode. You can still toggle between them at any time.
Mark Rounding Options:
AutoRound: If 'ON' then Race Mode will automatically advance to the next Mark after you leave the current Mark behind you more than 110 degrees port or starboard and you are between 1 times the GPS accuracy and 50 meters from it. This prevents AutoRounding if you needed to do a 360 or other maneuver in the middle of the course. You MUST be in Race Mode and your screen active for AutoRound to function.
Display Mark Rounding Side: If 'ON' then RaceTac will display the name of the current and next Marks in a color corresponding to the side you should leave Marks on when rounding. Red for Port, Green for Starboard, Blue for Optional.
Default Rounding Side: Select the default side when adding a Mark to the course. Can be changed for each Mark in Course Management.
Units of Measure:
Major Distance Unit: Lets you choose Nautical Miles, Statute Miles, or Kilometers.
Minor Distance Unit: Lets you choose the unit to display if you are within one major unit of the Mark. Can be Yards, Feet, or Meters.
Major to Minor Distance Switch Point: Choose when, as a fraction of a major unit, RaceTac switches from major units to minor units in displays. Previously (and default) was one major unit. You could now set it at, say, 0.25 for a quarter of a major unit.
Speed Unit: Can be Knots, MPH, KPH, or Meters/Second.
Depth Unit: Used in Charts. Can be Feet, Meters, or Fathoms.
Start/Finish Settings:
Starting Sequence: Sets the Start Timer initial minutes. Can be 'ISAF', 'ISAF+1' (6 minutes), 'Match' (10 Minutes), or any number of minutes as an integer.
Start Timer: Tones or Voice : Select either tones or voice sounds during the start timer countdown.
AutoFinish:See 'Race Mode' for detail on it's operation.
Chart Settings: Various chart options.
Coordinate Display Format: Choose the display format for latitudes and longitudes. See the Location entry discussion for the formats.
Advanced Settings:
Use Hardware Graphics Acceleration: This can speed up chart displays. But on some devices this can cause odd behavior when filling in areas (land, depth), so this allows you to turn it off. It may even be faster with it off on some devices.
Race Report
When the Race Timer is stopped, either manually using the stop button, or automatically using 'Auto-Finish', a log entry is kept of the race start time and elapsed time. You can view a report of up to the last 30 races from the 'Race Report' selection in the application menu. See the Timer section for more detail.